
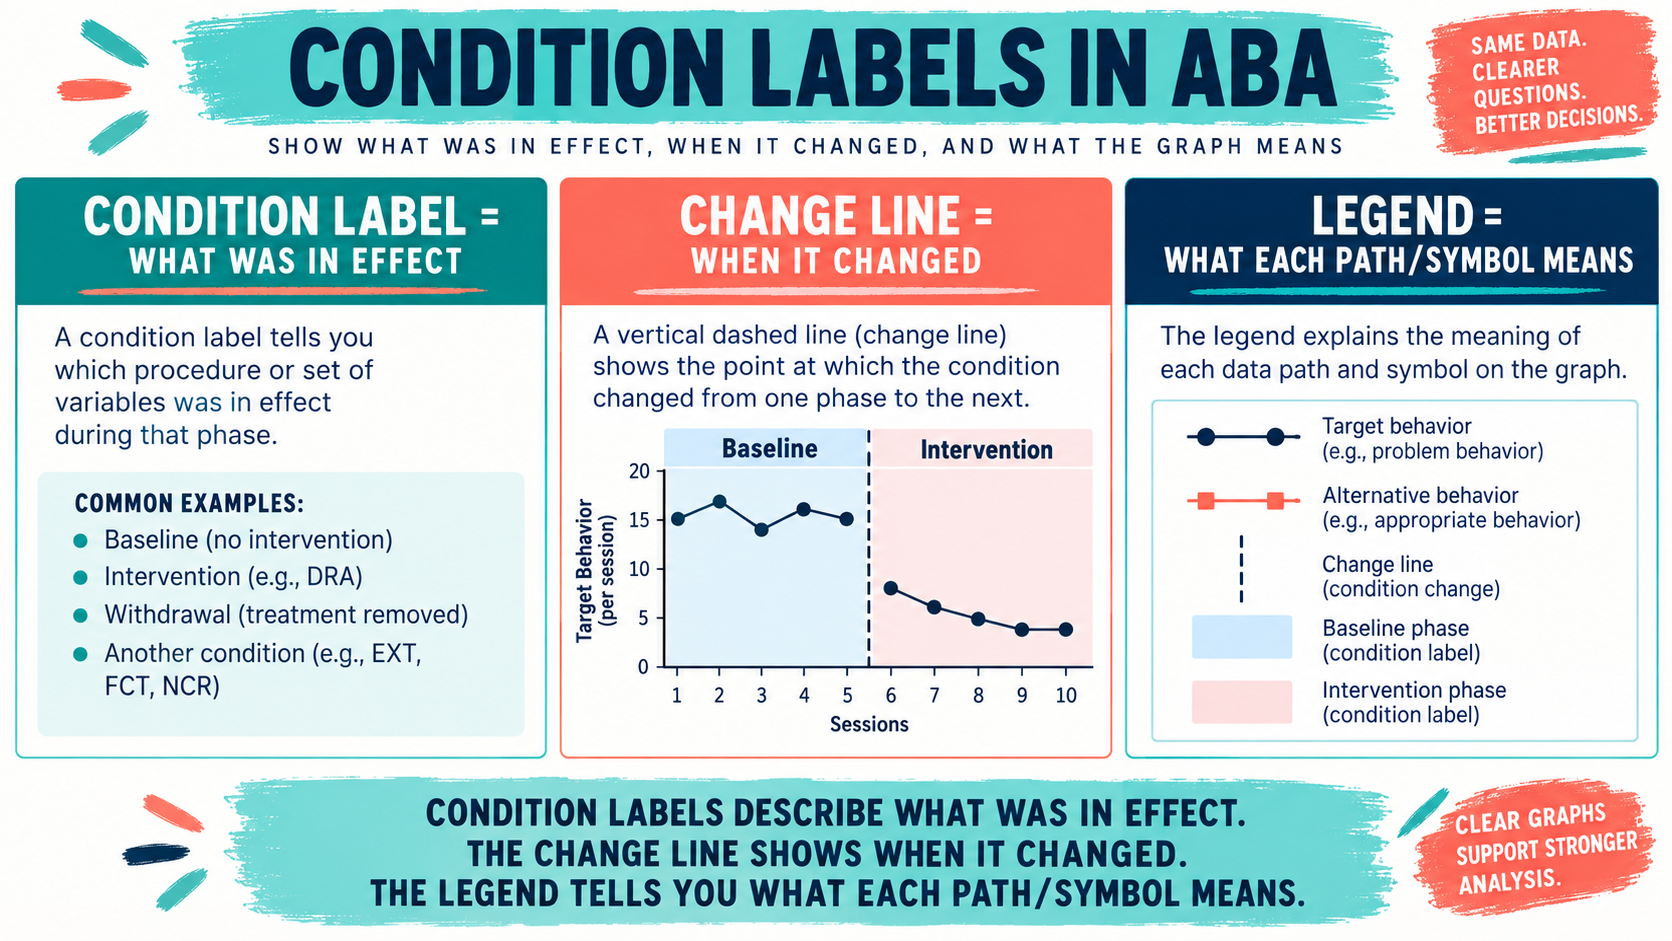
When you study condition labels in ABA, the key question is simple: what was operating during this segment of the graph? A condition label gives the reader a short name for the procedure, context, or arrangement in effect during a phase. It helps the reader connect the data to the intervention record without turning the graph into a paragraph of tiny notes.
Table of Contents
- What Are Condition Labels in ABA?
- Condition Label vs. Change Line vs. Legend
- Where Do Condition Labels Go on a Graph?
- How to Write a Strong Condition Label
- Version Changes and Documentation
- Examples Across ABA Conditions
- BCBA Exam Traps
- Quick Review Checklist
- FAQ
- Quick Review Checklist
- Take the Free BCBA Mock Exam
Condition labels are easy to confuse with the vertical line that marks a condition change or with a graph legend. Those elements work together, but they do different jobs. A label names the condition, a change line shows when the condition changed, and a legend explains what each data path or symbol represents. Keeping those jobs separate makes a graph easier to interpret and easier to replicate. Table of Contents
What Are Condition Labels in ABA?
A condition label is a concise description of the condition under which a set of data was collected. In a typical single-case graph, the label appears above the data segment that belongs to that condition. “Baseline” can identify a phase in which the intervention is not yet in place. “Intervention” can identify a treatment phase, but it may be too broad if the graph needs to show which procedure was actually implemented.
A more informative label might be “Token board + FR-3” when those components are the arrangement that matters to interpretation. “Visual schedule v2” may be appropriate when the second version of the schedule is materially different from the first. The exact wording depends on what changed and what the reader must discriminate.
The purpose is not to put every procedural detail on the graph. The purpose is to give each phase a short, neutral name that points to the complete protocol, implementation record, and relevant dates. A reader should be able to ask, “What was in effect here?” and then find the detailed answer in the linked record.
Condition labels are especially important when a graph contains multiple phases, a reversal, a withdrawal, a changing teaching arrangement, or more than one functional-analysis condition. Without them, a data path can look like a continuous story even though the independent variable, setting, or treatment package changed.
Condition Label vs. Change Line vs. Legend
Before interpreting a graph, separate the three visual elements:
| Graph element | Main job | Example |
|---|---|---|
| Condition label | Names the procedure, context, or arrangement operating during a phase. | Baseline; Token board + FR-3; Withdrawal. |
| Condition-change line | Shows the point in the sequence at which the condition changed. | A vertical dashed line between the last baseline observation and the first intervention observation. |
| Legend | Explains what each data path, marker, or symbol represents. | Blue circles = target behavior; coral squares = replacement behavior. |
The BACB BCBA Test Content Outline, sixth edition, places graphing and data interpretation within Measurement, Data Display, and Interpretation and also connects graphs to experimental design. The TCO does not turn one particular font or software layout into an official style rule. For exam purposes, focus on whether the graph communicates the relevant quantitative relation and whether the phase information supports a defensible interpretation.
This is why “condition label” is not another name for “phase line.” If a question asks which feature identifies the intervention in effect during a segment, choose the label. If it asks which feature marks when the independent variable changed, choose the condition-change line.
Where Do Condition Labels Go on a Graph?
Place a condition label above the data segment that it describes, usually centered between the condition-change lines that bound that segment. The label should not float over an unrelated phase, and the change line should not be drawn through a data point if the design can avoid it. The visual boundary should match the actual implementation record.
Suppose the final baseline observation occurs on Monday and the intervention begins on Tuesday. The baseline label belongs above the Monday-side phase, the intervention label belongs above the Tuesday-side phase, and the phase line belongs between those observations. If treatment was planned on Monday but was not actually implemented until Wednesday, the graph should not imply that the intervention was active on Monday simply because the plan was signed.
Use the same rule when a procedure changes during a longer treatment period. If the change is meaningful, add a new condition label and a new phase boundary. If the change is a minor correction that does not alter the comparable condition, document it in the implementation record and decide whether a new graph condition is necessary. The graph and protocol should tell the same story.
Labels can also identify different conditions in a functional analysis, such as attention, demand, tangible, and play. Those labels name the test arrangements, not conclusions about the function of behavior. A demand condition does not automatically prove that escape maintains the behavior; it identifies the arrangement under which the data were collected. The graph still needs the rest of the assessment context.
How to Write a Strong Condition Label
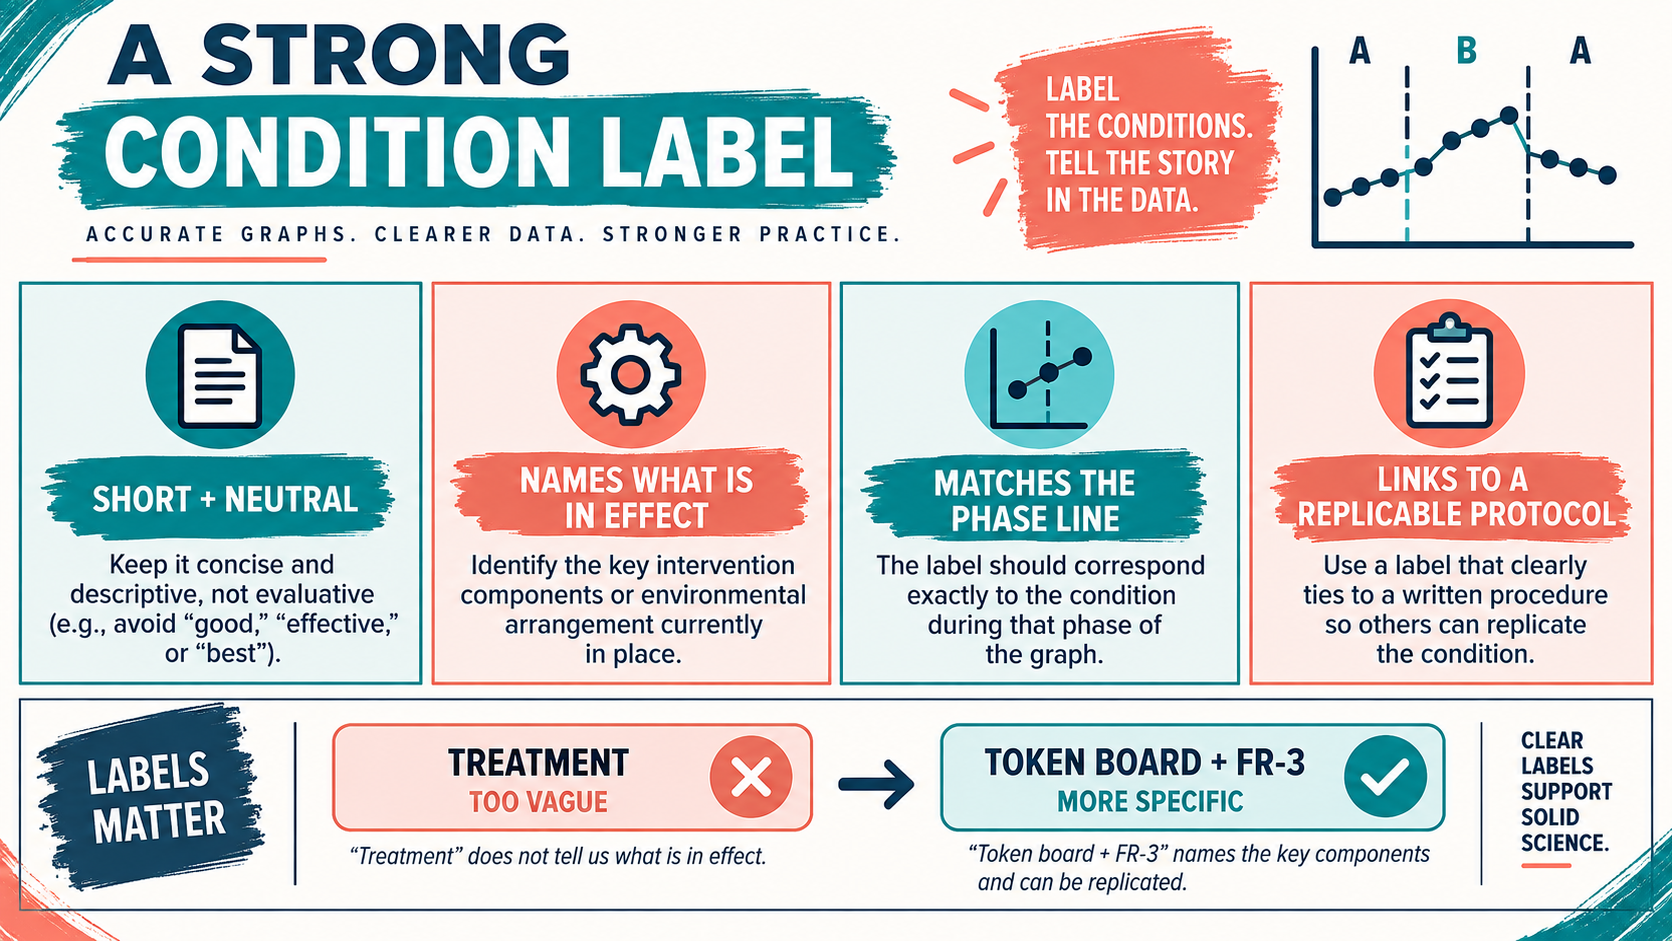
A strong label is short enough to read quickly and specific enough to connect to a replicable procedure. Use these four tests:
- Keep it neutral. “Intervention” or “Token board + FR-3” describes an arrangement. “Successful treatment” adds a conclusion that belongs in the data interpretation, not in the phase name.
- Name what is in effect. Include the component that distinguishes this condition from the prior one. If the reinforcement schedule changed, the schedule may belong in the label.
- Match the phase boundary. The label must describe the same period that the condition-change line defines. Do not use one label for two different procedures simply because both were intended to help.
- Link to a full protocol. A graph label is not a replacement for definitions, materials, prompts, reinforcement rules, implementers, and fidelity information. It is an index to those records.
| Too vague or evaluative | More useful label | Why it helps |
|---|---|---|
| Treatment | Token board + FR-3 | Names the key components that can be checked in the protocol. |
| Good phase | Visual schedule v2 | Identifies the version rather than judging the outcome. |
| After training | BST + coaching | Identifies the arrangement that changed rather than a vague calendar event. |
Version Changes and Documentation
Labeling becomes more important when a procedure has versions. A label such as “visual schedule” may be adequate if the arrangement stays stable. If the number of choices, prompt level, timing, or reinforcement rule changes materially, “visual schedule v2” or another specific label may prevent the graph from hiding an important change.
Keep the implementation record richer than the graph. At minimum, the record should make it possible to verify the label’s definition, version, start and end dates, setting, implementer, measurement rule, fidelity information, and meaningful deviations. A reviewer should not have to guess whether “FCT” means a particular communication response, prompt sequence, or reinforcement contingency.
Be careful with bundled changes. If a token board, a new prompt hierarchy, and a different schedule were introduced together, a label such as “treatment package v2” may be more honest than claiming that one component alone caused the change. The label should describe the condition that actually operated; the experimental conclusion should respect what was and was not isolated.
Also avoid using client identity, diagnosis, or judgmental language as the condition label. The condition is about the arrangement in which the measurement occurred. Personal information belongs in the appropriate secure record, not in a public-facing or unnecessarily identifying graph label.
Examples Across ABA Conditions
Condition labels look different depending on the graph:
- Baseline and intervention graph: “Baseline” followed by “DRA + FCR prompt” may distinguish the treatment arrangement better than “Before” and “After.”
- Withdrawal or reversal graph: “Intervention,” “Withdrawal,” and “Reintroduction” identify the sequence, while the actual procedure record explains what was added or removed.
- Functional analysis graph: “Attention,” “Demand,” “Tangible,” and “Play” identify test conditions. They do not independently establish behavioral function.
- Multiple-baseline display: the same condition label may appear across tiers, but the reader must still be able to identify the participant, setting, skill, or behavior represented by each tier.
- Maintenance or generalization phase: “Maintenance” or “Community setting” can be useful when the arrangement or context changes and the label is connected to a defined plan.
These examples are not a command to use one universal vocabulary. Use the shortest accurate term that matches the design and the protocol. If a reader could reasonably interpret two different arrangements as the same label, add the distinguishing component.
BCBA Exam Traps
On a BCBA question, slow down when the stem uses “condition,” “phase,” “label,” or “line” in the same paragraph. The common traps are:
- Calling the vertical boundary a label: the line marks when a change occurred; the words above the segment name the condition.
- Assuming a label proves a function: “Demand” names an assessment condition; it is not automatically the conclusion “escape-maintained.”
- Using outcome language: “effective,” “failed,” and “best” are interpretations. They do not identify the procedure neutrally.
- Ignoring a version change: if the procedure changed, a single broad label can conceal a new condition and weaken interpretation.
- Confusing legend and label: the legend explains symbols or data paths; it does not name the arrangement operating during a phase.
For the broader graphing context, review our ABA graphs BCBA exam guide, then return to this narrower question: what was in effect, when did it change, and can the label point to the record that defines it? When you want to practice discriminating among graph components in scenarios, try our free BCBA mock exam. It is a practice resource, not a replacement for the current BACB TCO, handbook, or supervisor review.
Quick Review Checklist
- Does each graph phase have a short label?
- Does the label identify the arrangement or context, not the outcome?
- Is the label positioned over the segment it describes?
- Does the change line mark the actual condition boundary?
- Are data paths and symbols explained separately in a legend?
- Can the label be traced to a dated, versioned, replicable protocol?
- Are functional-analysis condition names being kept separate from conclusions about function?
- Would a reader know what changed without searching through the entire chart?
FAQ
What is a condition label in ABA?: It is a concise name for the procedure, context, or arrangement in effect during a graph segment or phase. It helps the reader connect the data to the full implementation record.
Where should a condition label be placed?: Place it above the data segment it describes, generally centered between the condition-change lines that bound the phase. The exact layout can vary, but the label and boundary must refer to the same period.
Is a condition label the same as a phase-change line?: No. The label names what was in effect. The phase-change line shows when the condition changed. A legend has a third job: explaining data paths and symbols.
Can “treatment” be a condition label?: It can be a broad phase name, but it may be too vague for a graph that needs to distinguish procedures. If the key arrangement is a token board with a particular schedule, a more specific label can make the data easier to interpret and replicate.
Good condition labels in ABA are small words doing important work: they anchor the graph to the arrangement, timing, and evidence behind each phase. Write them neutrally, place them accurately, and keep the detailed protocol available for the person who must interpret or replicate the data.
Quick Review Checklist
Use this final checklist to turn condition labels in ABA into exam-ready reasoning. The goal is not to memorize a label in isolation; it is to identify the relevant evidence and explain why the best answer fits the scenario. Key ideas to review:
- State the central definition or decision point for condition labels in ABA in your own words.
- Identify the detail that makes condition labels in ABA different from its closest related ABA term.
- Separate the observable facts in a scenario from assumptions that are not supported by the facts.
- Write one example and one nonexample so you can recognize the concept in a new setting.
Exam application checks:
- Ask what the question is actually requesting before comparing the answer choices.
- Mark the antecedent, response, consequence, or other evidence that supports the selected answer.
- Look for a distractor that describes a related process but does not answer the specific question.
Final self-check:
- Explain how you would verify the interpretation with clear observations or data.
- Change one detail in the scenario and decide whether your answer should change.
- Give a one-sentence rationale that a supervisor or study partner could evaluate.
Take the Free BCBA Mock Exam
If you want a low-pressure way to check your recall, use the free practice resource below. Take the Free BCBA Mock Exam